Growing and Caring for Alocasia Odora
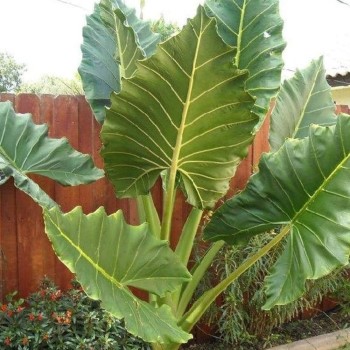
Alocasia odora is a big evergreen perennial native to East and Southeast Asia. It is sometimes referred to as giant elephant ear, Asian taro, and night-scented lily. The remarkable size of its leaves, which may grow up to two feet tall at maturity, makes it a favorite decorative plant. Under ideal circumstances, the entire plant often reaches a height of six to eight feet. The alocasia odora may be cultivated inside, outdoors, and in shadow gardens where its massive foliage is the focal point. Nevertheless, this perennial also yields big, peach-colored blooms that mimic lilies' spathe-like shapes, but it is rare to see these blooming inside. Alocasia odora is harmful to people and dogs if consumed, much like all other plants in the genus, so be cautious if you have inquisitive children roaming around.
Giant elephant ear, Night-scented lily , Asian taro
Alocasia odora
Araceae
Perennial and corm
4-6 feet broad, 4-8 feet tall
Thrives partial shade
Moist, yet well-drained
Prefers acidic soil
Blooms in Spring and summer
Pink, orange, white
9-11, USDA
Asia
How To Care Alocasia Odora
Alocasia Odora thrives in mild to bright indirect sunshine. Keep in mind that they should not be exposed to direct sunshine or low light as this might burn their leaves. If there isn't enough light where your alocasia is, you could want to use a grow lamp to increase the amount of leaf. Alocasia Odora prefers regular misting, watering about every two weeks, and keeping their soil damp but not soggy. To avoid overwatering and root rot, we advise letting the top two to three inches of soil dry out in between waterings. This plant cannot withstand drought, and prolonged dry spells will cause the margins of the leaves to become brown.
Light
This perennial loves shade, which is good news for homeowners and gardeners with limited light. It thrives in mild to bright indirect light inside and in partial to complete shade outdoors.
Soil
Rich, wet, and well-draining soil is ideal for this alocasia. To add nutrients and aeration, combine potting soil with plenty of perlite and some orchid bark when growing it indoors or in pots. If you want to cultivate alocasia odora in your yard, steer clear of clay soils and add tons of sand, perlite, and new potting soil to improve drainage and soil quality.
Watering
Watering an alocasia odora on a regular basis while considering drainage is part of its care. In the summer, water once every five to seven days when the top layer of soil (3 to 5 cm) has dried up. Soft, well-settled water is ideal. The leaves are forcefully doused with water at least once a day. Additionally, the leaves need to be cleaned often with a moist cloth. Lower the frequency in the winter to prevent overwatering. Use filtered or settled water since Alocasia odora indoors is susceptible to hard water.
Temperature & Humidity
Alocasia odora is hardy in USDA zones 9 through 11 and thrives in warm, humid weather. This alocasia is best suited for gardeners outside of these zones as a houseplant or container plant where it may be readily shielded from chilly winter temperatures. Nevertheless, if you'd like, you may plant alocasia odora outside throughout the summer and then dig up the corms and keep them within for the winter. For the most robust development, keep the humidity around 60% and avoid exposing this alocasia to temperatures below 60 degrees Fahrenheit (15 degrees Celsius).
Fertilizer
When this plant is actively developing in the spring and summer, it might benefit from frequent fertilization. Both slow-release fertilizer and balanced liquid fertilizer are great choices. The odora, like all alocasias, remains dormant in the fall and winter and shouldn't be fertilized at this time.
Pruning
Use clean, sharp shears to trim Alocasia odora leaves that are yellow, dead, or severely damaged at the base of the petiole. Avoid trimming too many healthy leaves at once and only trim during vigorous growth in the spring or summer. Frequent trimming helps the plant concentrate its efforts on growing new, healthy leaves while also keeping it neat and improving ventilation.
Propagating
Division is the most popular method of alocasia odora propagation. As this alocasia matures, it naturally produces additional corms and plants, so you may divide your plant to manage its growth or just make new plants to share with loved ones. Here are some easy techniques to propagate Alocasia odora. First, search for distinct stems in the container to make sure your plant is ready to be divided. These will resemble miniature plants with their own corms, sometimes growing close to the base of the parent plant. When dividing a plant that is growing in a pot, it is typically easier to take the entire plant out of the container (repotting is an excellent time for this). If it's grown in a garden, use a shovel or trowel to dig out the portion of the plant you want to divide. Pull the two plants apart gently, breaking as few roots as you can. If the offshoots still have a substantial tap root attached to them, you will need to cut it off in order to separate them. Replant or repot the mother plant and give it plenty of water after you have split one or more of the plant's offshoots. Put it back where it was if it was in a pot. Plant the newly split offshoots right away. Before planting, you can put them in a vase of water for a few weeks to help them establish new roots if they just have the big tap root or if the majority of the roots were cut off during the removal procedure. If not, put them in rich soil that drains well and give them plenty of water.
From Seed
Alocasia odora is a slow yet rewarding plant to grow from seed. On the surface of a wet, well-draining mixture (such as peat + perlite), plant fresh seeds and gently push them in without deeply burying them. Cover the medium with a plastic dome or put it in a propagation box to keep it constantly warm (24-28°C) and humid. To stop mold, provide soft airflow and bright, indirect light. In two to six weeks, seeds often sprout into tiny bulbs that gradually produce their first leaves. During the first several months, seedlings develop slowly, so be patient and keep the soil slightly damp but not soggy.
Potting & Repotting
Once an alocasia odora has outgrown its container, it should be repotted, generally every one to two years. Since the plant is actively developing and can heal more rapidly, try to wait until spring or summer to repot. Refresh as much of the potting soil as you can without shattering too many roots in a pot that is just two to four inches bigger than the last container. Considering how big these alocasia may become, don't be scared to enlist a friend to assist you.
Overwintering
Alocasia corms may be overwintered quickly and easily. When fall temperatures start to drop, trim off any leftover leaves and remove the corms, taking care to preserve the roots. After cleaning the corms and roots of any dirt, place them in a warm, dry place to dry out entirely for a few weeks. The corms can then be kept for the winter in a paper or mesh bag in a dark place with some coco coir. When the corms are ready to be planted again after the last frost, rehydrate them by submerging them in water for 20 to 25 minutes. After that, put them in well-draining soil in a shaded or slightly shaded area and give them plenty of water.
How To Bloom
Although Alocasia odora is an uncommon indoor plant, it may produce peach or white spatha-shaped blooms in the yard. They are frequently trimmed back to save energy since they are not as aesthetically pleasing as the leaves. Because of its robust root structure, Alocasia snow odora batik sometimes blooms more often.
Pests, diseases, and other problems
Keep an eye out for common pests on your alocasia odora, including as mealybugs, aphids, and spider mites. Additionally, it is vulnerable to a few common diseases, such as leaf blight and root rot. As soon as you become aware of a pest or disease, treat it. If at all feasible, separate the afflicted plants to stop it from spreading. Because alocasias need humid environments, they are frequently seen as picky and difficult to cultivate, especially when grown indoors in dry environments. Because of this, it's common to encounter some issues when learning how to take care of these tropical plants. There are several possible reasons why the leaves on your plant are becoming yellow. It usually indicates that your alocasia is not receiving enough light, humidity, or water, but it may also be caused by overwatering, too much sun, or insufficient light. To identify the most likely culprit, you will ultimately need to assess the present growth circumstances of your plant. Additionally, keep in mind that yellow leaves might occasionally be a perfectly natural aspect of a plant's life cycle. You probably shouldn't be concerned if the oldest leaves are the only ones that occasionally turn yellow and fall off. Brown, crispy leaves are nearly always an indication that your plant is not receiving enough moisture. However, this alocasia may also develop leaf burn, which appears as brown, crispy patches, if it is exposed to excessive amounts of direct sunlight. Lack of light or underwatering are probably the causes of limp, drooping leaves. Make sure the soil never dries out more than a few inches and remains uniformly hydrated. Additionally, remember that this alocasia does not thrive in low light indoors, even though it may live in shaded areas. To keep the alocasia odora happy and healthy inside, make sure you provide it medium to strong indirect light.