Growing and Caring for Alocasia Sarian
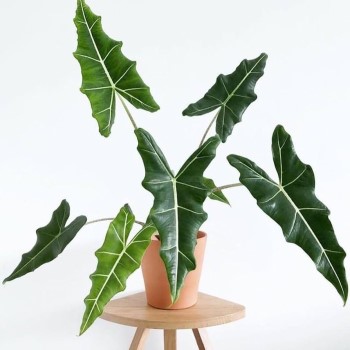
Alocasia sarian is a tropical plant from the Philippines, often grown as a houseplant in cooler climates. Once believed to be a natural hybrid of Alocasia zebrina and Alocasia micholitziana, it is now classified as a variety of Alocasia macrorrhizos, or giant taro. This plant is admired for its arrow-shaped leaves with white veins and pale green stems marked with deep red stripes. It thrives in warm, humid environments with bright, indirect light, temperatures between 62°F and 72°F, and acidic, well-draining soil. Like other Alocasia species, Alocasia sarian is toxic to both humans and pets.
Elephant ear
Alocasia 'Sarian'
Araceae
Perennial and bulb
Reaches up to 5 feet indoors and up to 12 feet when grown outdoors.
Thrives partial shade
Moist, yet well-drained
Grows best in acidic to neutral soil
Blooms in Spring and summer
Creamy white or Pale yellow
10-11, USDA
Philippines
How To Care Alocasia Sarian
These are the key care guidelines for growing Alocasia Sarian. Provide abundant bright, indirect light. Use a well-draining, acidic potting mix that retains some moisture. Keep the soil evenly moist with regular watering. Feed the plant with a balanced houseplant fertilizer.
Light
Alocasia sarian thrives in bright, indirect light or filtered sunlight when grown outdoors. For indoor plants, place them near an east-facing window to enjoy gentle morning light, or a few feet away from south- or west-facing windows to avoid harsh afternoon sun. Avoid direct sunlight, as it can scorch the leaves.
Soil
Grow Alocasia sarian in a loose, nutrient-rich potting mix that drains well, incorporating peat moss or coco coir to retain moisture. A standard houseplant mix works fine, or you can mix in perlite or orchid bark to improve drainage.
Watering
Maintain Alocasia sarian's soil evenly moist without letting it become waterlogged. These tropical plants prefer consistently moist soil, but excess water can lead to fungal problems such as root rot. Water when the top layer of soil starts to dry, and always empty saucers or cache pots to prevent the plant from sitting in standing water.
Temperature & Humidity
This tropical plant thrives in humidity levels of 50% or higher, which is often more than typical indoor conditions. To increase humidity, place Alocasia sarian near other plants to create a humid microclimate or use a nearby humidifier. It also prefers moderate temperatures between 60°F and 80°F, and exposure to 50°F or lower for even a short time can severely harm or kill the plant.
Fertilizer
Fertilize Alocasia sarian every two weeks during the growing season using a balanced liquid houseplant fertilizer at half strength. Start feeding when new growth appears in late winter or early spring and continue through fall. Avoid fertilizing during the fall and winter months.
Pruning
Regular pruning isn't necessary for Alocasia sarian, but it's helpful to trim damaged, yellow, or dead leaves at the base as they appear. Be careful not to remove more than about 25% of the plant's total foliage at a time.
Propagating
Alocasia sarian can be propagated by separating basal offsets, or baby plants, from a mature specimen. Wait until offsets appear around the base of the mother plant, and try to propagate during spring or summer when the plant is actively growing. Prepare fresh potting mix, small pots for the offsets, a sharp sterilized knife, and water before starting. Check the base of your plant for offsets emerging from the rhizome. If none are present, wait until they develop. When offsets are available, gently remove the plant from its pot and loosen the soil around the root ball. Select offsets with healthy roots and well-formed leaves. Carefully cut the offset from the mother plant using the knife, keeping the leaves, stem, and roots intact. Fill small pots with potting mix and plant each offset, along with the mother plant, in separate containers, ensuring the soil line remains the same as on the original plant. Water thoroughly, place the pots in a warm spot with bright, indirect light, and maintain consistently moist soil. New leaf growth will indicate that the offsets have successfully established.
From Seed
Growing Alocasia sarian from seed is slow but rewarding. Soak the seeds for 24-48 hours before planting them in a well-draining, moist seed-starting mix. Keep the soil warm and humid until germination, which may take several weeks. Once seedlings emerge, provide bright, indirect light, maintain even moisture, and transplant them into larger pots as they grow.
Potting & Repotting
Alocasia sarian should be repotted approximately every two years. Indications that repotting is needed include roots emerging from the drainage holes, roots covering the soil surface, or a lackluster appearance with slowed growth. When repotting, use fresh soil and choose a pot one size larger than the current one. Opt for glazed ceramic or plastic pots with drainage holes, and avoid terracotta pots, as they draw moisture from the soil too quickly.
Overwintering
Alocasia sarian is sensitive to cold, so during winter, keep it in a warm environment above 60°F (16°C). Reduce watering, allowing the soil to dry slightly between waterings, and avoid fertilizing until spring. Provide bright, indirect light or use a grow light to compensate for shorter days. Maintaining humidity above 50% will help prevent leaf stress, and any yellowing or dying leaves can be pruned to keep the plant healthy through the dormant period.
How To Bloom
Alocasia sarian rarely blooms indoors, but healthy, mature plants have the best chance of flowering. Provide bright, indirect light, high humidity, consistently moist soil, and warm temperatures between 70-85°F. Regular fertilization during the growing season can also encourage flowering, though its striking foliage is usually the main attraction.
Pests, diseases, and other problems
Alocasia sarian can be affected by common houseplant pests such as spider mites and mealybugs. Check the leaves regularly for signs like sticky honeydew or cottony white clusters, which indicate mealybugs. Yellowing leaves, a dusty appearance, and fine webbing are signs of spider mites. Treat infestations using insecticidal soap or horticultural oil. Yellowing leaves on the lower part of Alocasia sarian often indicate overwatering. Check the soil and adjust your watering routine as needed, and in severe cases, consider repotting in fresh soil. On the other hand, dry conditions can lead to brown leaf tips with yellow edges. To help, increase the humidity around the plant.