Growing and Caring for Alocasia 'Tiny Dancer'
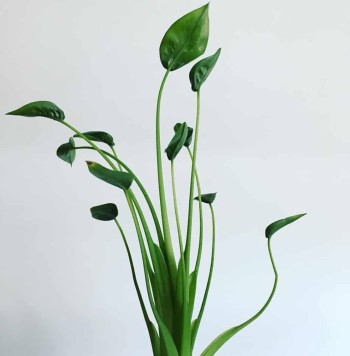
Tiny Dancer Alocasia, which has gained popularity because to its unusual cup-shaped leaves, is a great accent in a terrarium or next to a sunny window. This little elephant ear grows quickly and features curled-edged, luscious green leaves on thin petioles. Similar to other Alocasias, Tiny Dancer needs only regular watering and humidity to grow in bright, indirect light. Take caution when putting Tiny Dancer Alocasia in a home with youngsters and curious pets because it is said to be hazardous to both people and dogs.
Alocasia tiny dancer
Alocasia 'Tiny Dancer'
Araceae
Corm, perennial
11-18 inches broad and 14-20 inches tall
Thrives partial shade
Moist but well-draining
Grows best in acidic to neutral soil
Blooms in Spring and summer
Green, White
10-11, USDA
Southeast Asia and Eastern Australia
How To Care Alocasia Tiny Dancer
Alocasia Tiny Dancer requires comparable care as many other species of Alocasia. This tropical plant needs plenty of sunshine, mild temperatures, and steady watering. Under the right circumstances, it develops rapidly, releasing new growth every several weeks. Pruning is not necessary, but removing old growth as it dies off can keep the plant looking tidy. There is no need to be concerned if there is no blossoming. Growing Alocasia Tiny Dancer indoors prevents it from blooming.
Light
Alocasia Tiny Dancer does well in areas that are well-lit but do not receive direct sunshine. Its delicate leaves can be burned by too much light, and its foliage will fade and its development will be slowed by too little light. Put it next to a window that faces east or west, and cover it with a curtain if needed to block off the sun's rays.
Soil
Rich, well-draining soil that retains some moisture is ideal. You may make your own at home by combining equal parts potting soil, coco coir, orchid bark, and perlite, or you can purchase a specialist soil mix designed specifically for aroids. This mixture offers sufficient moisture retention, nutrients, and drainage.
Watering
Like many Alocasia species, Tiny Dancer likes wet, well-draining soil. Although it prefers moisture, Tiny Dancer Alocasia cannot withstand damp soil. Before deeply watering until water emerges from the drainage holes, let the top two to three inches of soil dry. The margins of the leaves will get crispy and brown if the soil dries out too much. Lighting, humidity, temperature, and season all affect how much water is needed, so always feel the soil before watering.
Temperature & Humidity
The tropical plant Alocasia Tiny Dancer grows best in temperatures between 18°C and 26°C. It cannot withstand temperatures lower than 15°C. In the winter, keep it away from radiators, front doors, and windows with inadequate insulation. The leaves may become yellow due to abrupt temperature fluctuations. The Tiny Dancer enjoys dampness, much as other Alocasias. It may have issues with the dry air in a warm interior setting. Put a basin of water next to its pot, use a humidifier, or arrange your plants to create a microclimate. Although it's not necessary, misting can help make the area surrounding the plant more humid.
Fertilizer
Alocasia Tiny Dancer is one of the several alocasia plants that are heavy eaters. Regular fertilizer will help it develop quickly in the spring and summer. For optimal results, apply a half-strength diluted balanced liquid fertilizer once every two to three weeks. During the fall and winter, completely stop fertilizing your plant.
Pruning
To maintain the health of the plant, remove any yellow, dry, or broken leaves. Using a serrated knife, trim each leaf at the base. By removing wilted leaves, you may move nutrients to the young, healthy portions of the plant instead of wasting them. Infected leaves should be trimmed as soon as signs appear if pests or diseases begin to appear.
Propagating
The easiest way to propagate this tuberous plant is to divide and expand its corms. Alocasia corms may be grown in a few simple steps: Take corms out of a mature plant's soil. You can omit the first few stages in this list if the corms already have some leaves and roots. The corms will develop more quickly if the brown exterior "husk" is removed. To produce a humid greenhouse-like atmosphere, place the corms in a container with damp sphagnum moss, pointed side down, and cover the container with a transparent plastic bag. Place the container in an area that gets plenty of indirect light. Make sure the moss is consistently damp. You should see some development after a few weeks, either in the shape of tiny shoots from the top of the corm or roots. It can be moved to soil after the roots are two to three inches long. Place the established corm in a container filled with a soil combination that drains well. After giving it plenty of water, return it to its original light spot. Maintain uniform soil moisture.
From Seed
Fresh seeds should be planted in a wet seed-starting mix in order to cultivate Alocasia from seed. To preserve humidity, keep the temperature at a constant 75°F (24°C) and cover with a plastic dome. Expect germination in three to four weeks after giving the soil a little spray as needed. As seedlings grow, give them lots of light and treat them the same way you would adult plants.
Potting & Repotting
This Alocasia should only be transferred once it has outgrown its old container, which is often every two years or so. Regular repotting is not necessary. The plant has outgrown its pot if roots are emerging from the drainage holes or if the pot's sides are protruding. The ideal time to repot is in the spring. Select a pot that is two to three inches bigger than its preceding container before you start. You risk unintentionally overwatering your plant if you move it into a too big pot. Take your plant out of its old container and, being careful not to harm the roots, carefully shake off as much of the old dirt as you can. After filling the new container with a rich, well-draining soil mixture, plant the plant and give it plenty of water. To reduce the risk of shock and maintain uniform soil moisture, return the just potted plant to its original spot. After repotting, wait a few weeks before fertilizing your plant.
Overwintering
Before the first frost, bring the plant indoors to overwinter. As the plant goes into a semi-dormant condition, put it in a well-lit space and water it less frequently. If the plant is still actively developing, be sure to maintain high humidity levels and sometimes apply mild fertilizer.
How To Bloom
Alocasia 'Tiny Dancer' may not bloom until it has reached full maturity, which can take up to 2-3 years. Outdoor plants in tropical regions bloom much more frequently. Even with optimal care, blooming is not assured. Many owners have never seen a flower. Blooms are not particularly spectacular, and most people cut them off to preserve energy for leaves. If you want to focus on leaf growth rather than blossoms, cut the bloom stems.
Pests, diseases, and other problems
Watch out for typical pests of houseplants, such as thrips, fungus gnats, spider mites, and mealybugs. Isolate the plant right once and apply an insecticide if you see any indications of bugs. Like the majority of Alocasia, small dancer can get root rot if its growth environment is too damp. Keep an eye out for signs of root rot, such as yellowing foliage, withering leaves, and squishy stems. Alocasia tiny dancer has certain preferences when it comes to its developing surroundings. Keep a look out for these typical issues, which suggest that your plant's care regimen has to be modified. Lack of moisture and humidity is typically the cause of brown leaves. Keep the soil uniformly wet, and keep the plant away from vents and drafty windows. Move it into a more humid area, such as a bathroom, or place a tiny humidifier nearby to give it some more moisture. Diagnosing yellow leaves can be challenging since there are several potential reasons. Although yellow leaves can also be a sign of root rot, which often results from overwatering, underwatering is the more frequent. It may be a normal aspect of the plant's growth cycle if you observe that the oldest leaves on your plant-typically those on the outside-are beginning to turn yellow and fall off. There can be an issue if you see that your plant is suddenly experiencing a lot of yellow leaves or that the new growth is becoming yellow. Examine the growth circumstances of your plant to see if it is being overwatered or underwatered. There are two possible reasons why your plant can abruptly lose all of its leaves. Your plant has probably gone into dormancy, which is natural, if this happens in the fall or winter. Just reduce watering until new growth appears in the spring. If your plant loses all of its leaves in the spring or summer, there's probably a problem with the way it's being cared for. This might be the result of either underwatering (together with dry, compacted soil) or overwatering (along with root rot).